How to Build a Scalable Streaming App with Django, Celery & YugabyteDB

DevRel @Tune AI
When building real-time applications, there are many database options to choose from.
If you’re looking for a high-performance database that can handle large-scale data, YugabyteDB is a great option. It’s a distributed SQL database that lets you easily scale your database to handle more data as your application grows. YugabyteDB also offers high performance for both reads and writes, so your application remains responsive even as data volume increases.
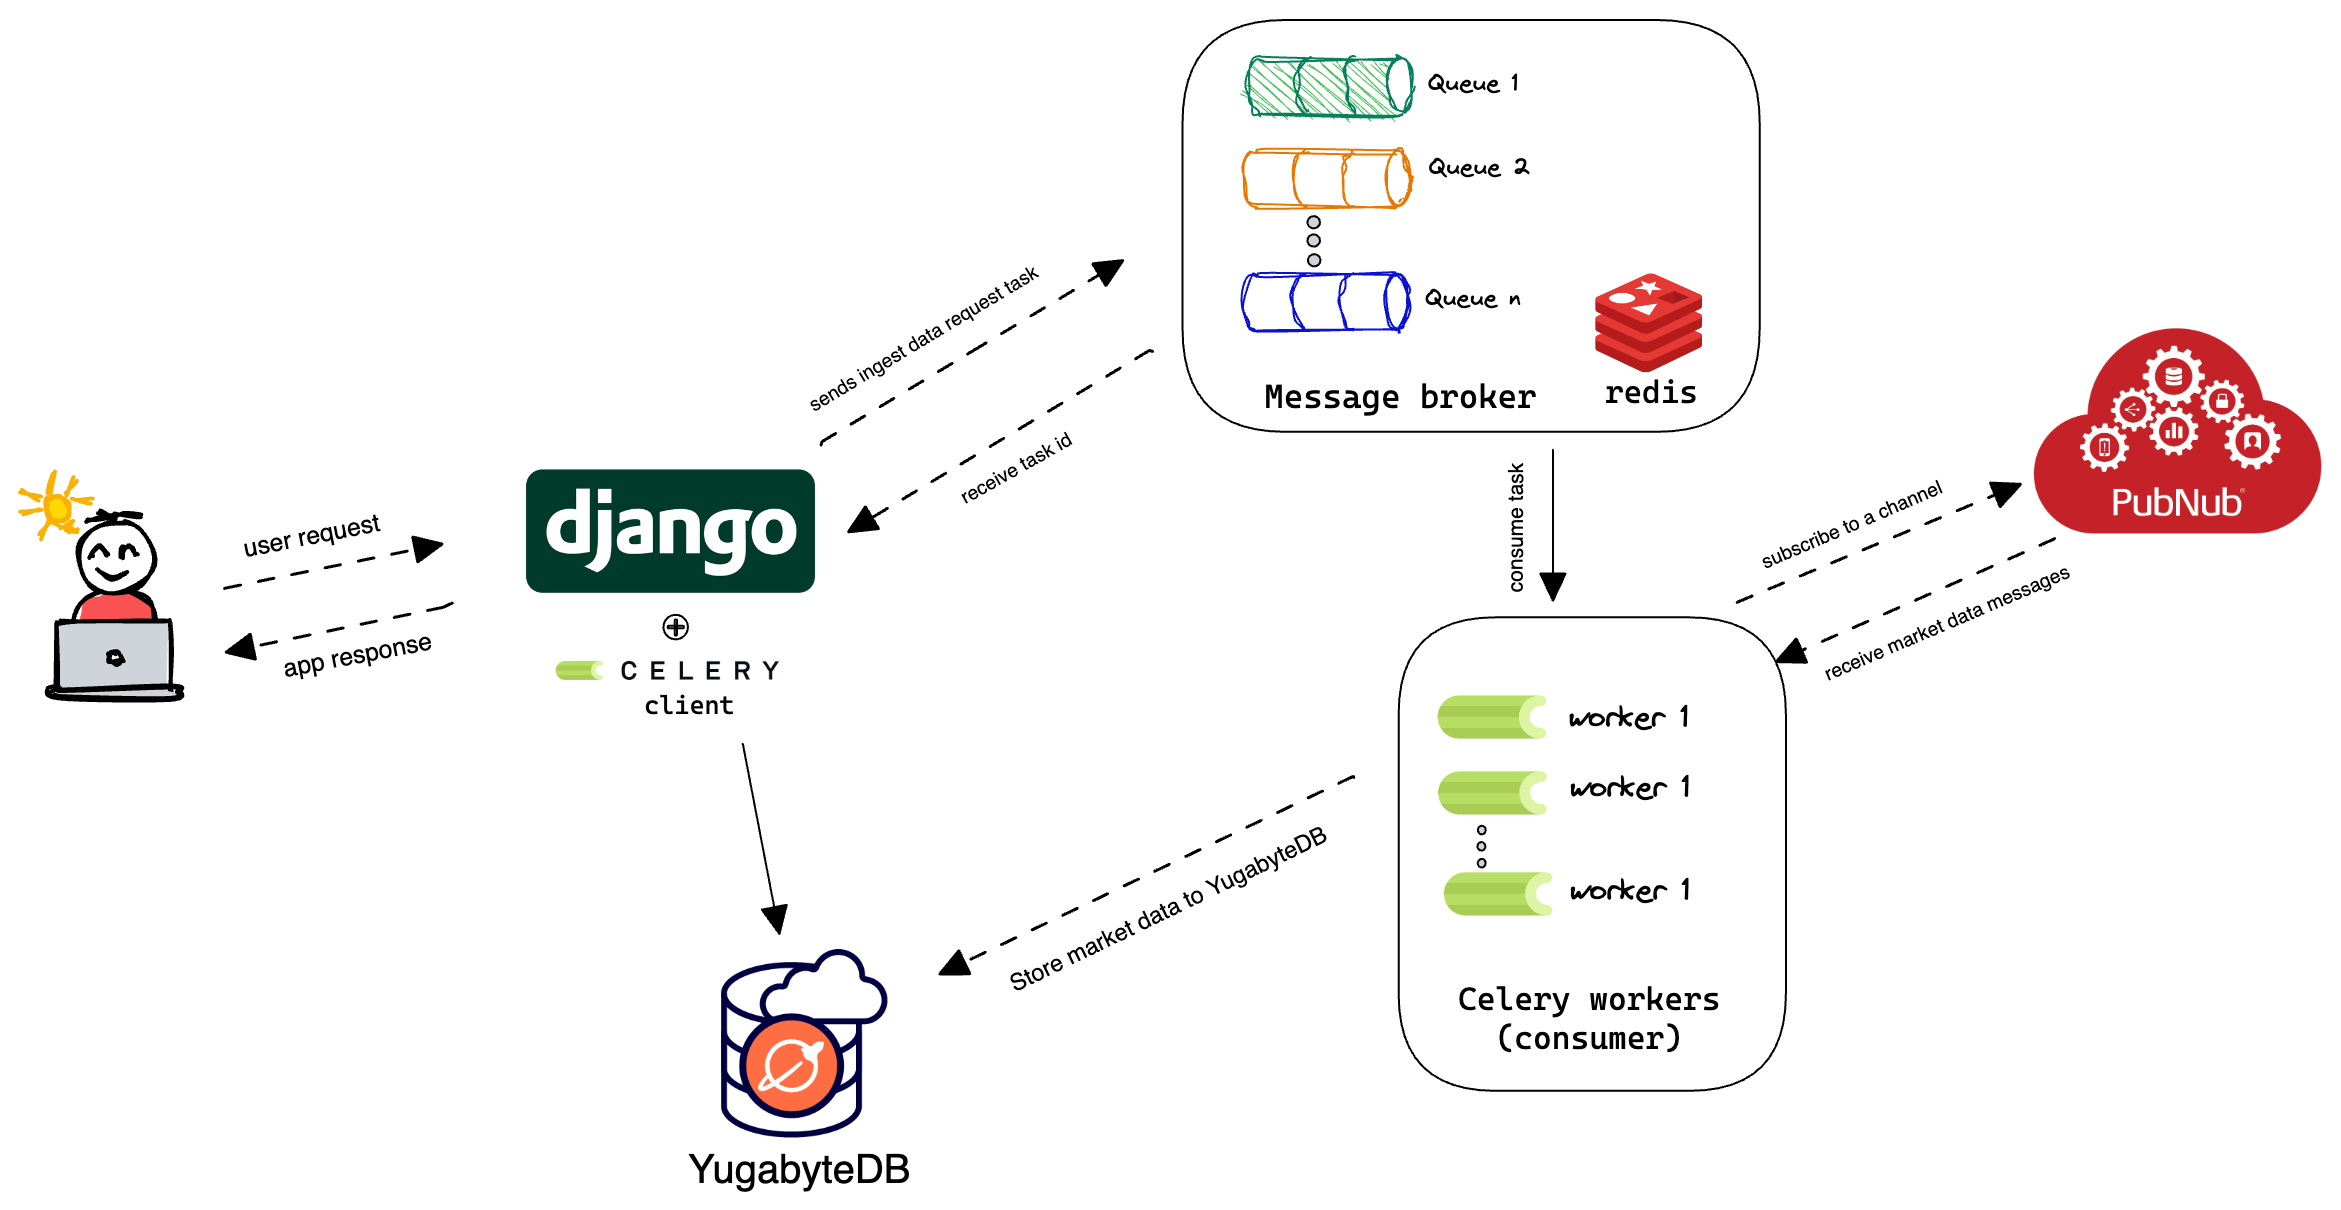
In this blog, I will build an application with YugabyteDB and Django, using the PubNub market order data stream. You will see how you can use YugabyteDB and Django to make an application that subscribes to the PubNub Market Orders Stream, stores these trades in YugabyteDB, and displays them in real-time.
Django is a high-level Python framework that enables rapid development of web applications. It includes a wide range of features, such as an ORM, template engine, URL routing, and authentication system.
PubNub is a global Data Stream Network (DSN) providing real-time messaging and streaming APIs. It is the perfect choice when building applications that require real-time data streaming.
The application uses Celery task queue to ingest the realtime market data stream to YugabyteDB. Celery is distributed task queue which can process data in the background, offloading work from the application web server. It allows asynchronous task processing, especially useful when dealing with large amounts of data. For long-running tasks, it's recommended that you use task queues.
Running on YugabyteDB Managed
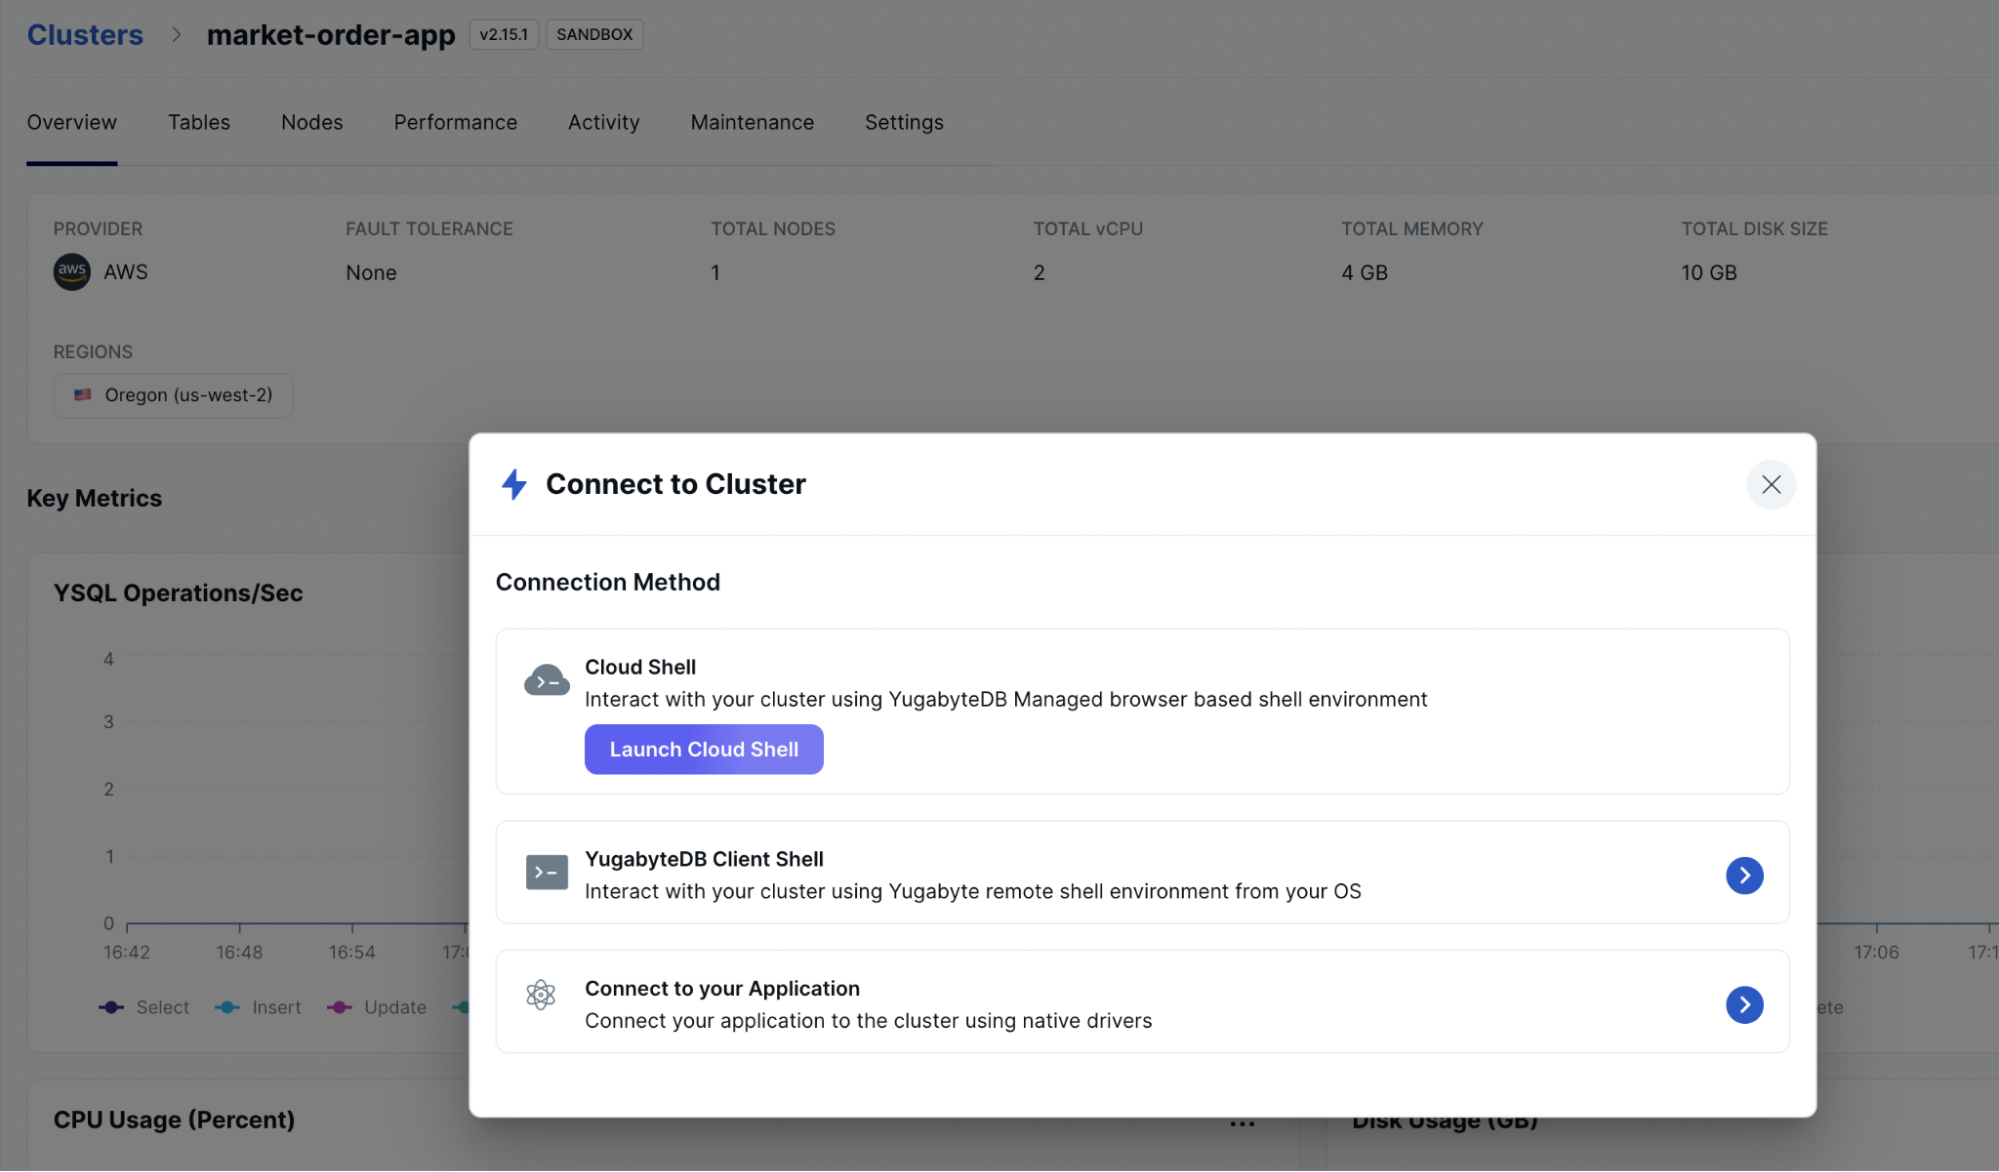
YugabyteDB provides a fully-managed DBaaS offering that supports AWS and GCP platforms. We will use YugabyteDB Managed to create a database cluster.
After setting up a YugabyteDB Managed account, you’ll need to create a cluster to populate your streamed trade data. Set up your IP Allow List, as below.

You can also start the cluster locally. Setup instructions are detailed in the project repository.
Now that we’ve created a cluster, we can connect to it via the ysqlsh CLI, or the YugabyteDB Managed Cloud Shell. You can use your favorite DB tools, such as - DBbeaver.
For this application we will be using the yugabyte database to store the trade data. yugabyte database is the default database on your database cluster instance.
Connecting YugabyteDB Managed with the Application:
Now we’re ready to initialize the database. Before connecting the application to the database, ensure you have the project set up with the dependencies. You can follow the setup instructions in the project repository.
- Configure your environment variables in the .env file (create a .env file if it doesn't exist, check
.env_example):DATABASE_URL=postgresql://yuagbyte:yuagbyte@usxx.ybdb.io:5433/yugabyte Run the following to initialize the database with model schema:
$ python manage.py makemigrations
$ python manage.py sqlmigrate market_orders 0001_initial # or your migration file
$ python manage.py migrate
This will create tables for the models as written in the
market_orders/models.pyWe can seed some initial users as sample data for the
Usermodel. Run the following to insert the default user data forUsertable:$ python manage.py runscript seed_user_dataseed_user_data.pywill create user data using the[faker](https://github.com/joke2k/faker)module and inserts it into theUsermodel table. But for the best practice, use fixtures to load the initial model data.
Using the YugabyteDB Managed Cloud Shell, we can now verify that the database has been properly initialized.

Running the Market Orders Application
Assuming that you have followed the instructions up to now, you are ready to run the sample application.
To run the application, type the following command inside the app project directory
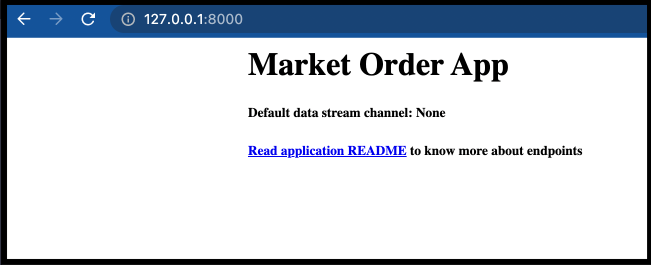
$ python manage.py runserver
In your browser, you should see the application running at http://127.0.0.1:8000
Running the Celery task to ingest the data
Install redis to use it as a broker and backend to store the task results. For the backend, you can also use YugabyteDB, by tweaking the celery backend configuration in the
market_order_app/settings.pyfile.Open 3 terminal windows to run -
redis-server,celery worker(in Django project directory), and Django app server to run respectively.- Terminal 1:
redis-server - Terminal 2:
celery -A market_order_app worker --loglevel=info --concurrency 3 # starts the celery worker to take tasks from the redis queue - Terminal 3:
$ python manage.py runserver
- Terminal 1:
In the terminal where Celery worker is running, you can see the task request received by the worker in the output (after requesting /ingeststreamdata/task endpoint).
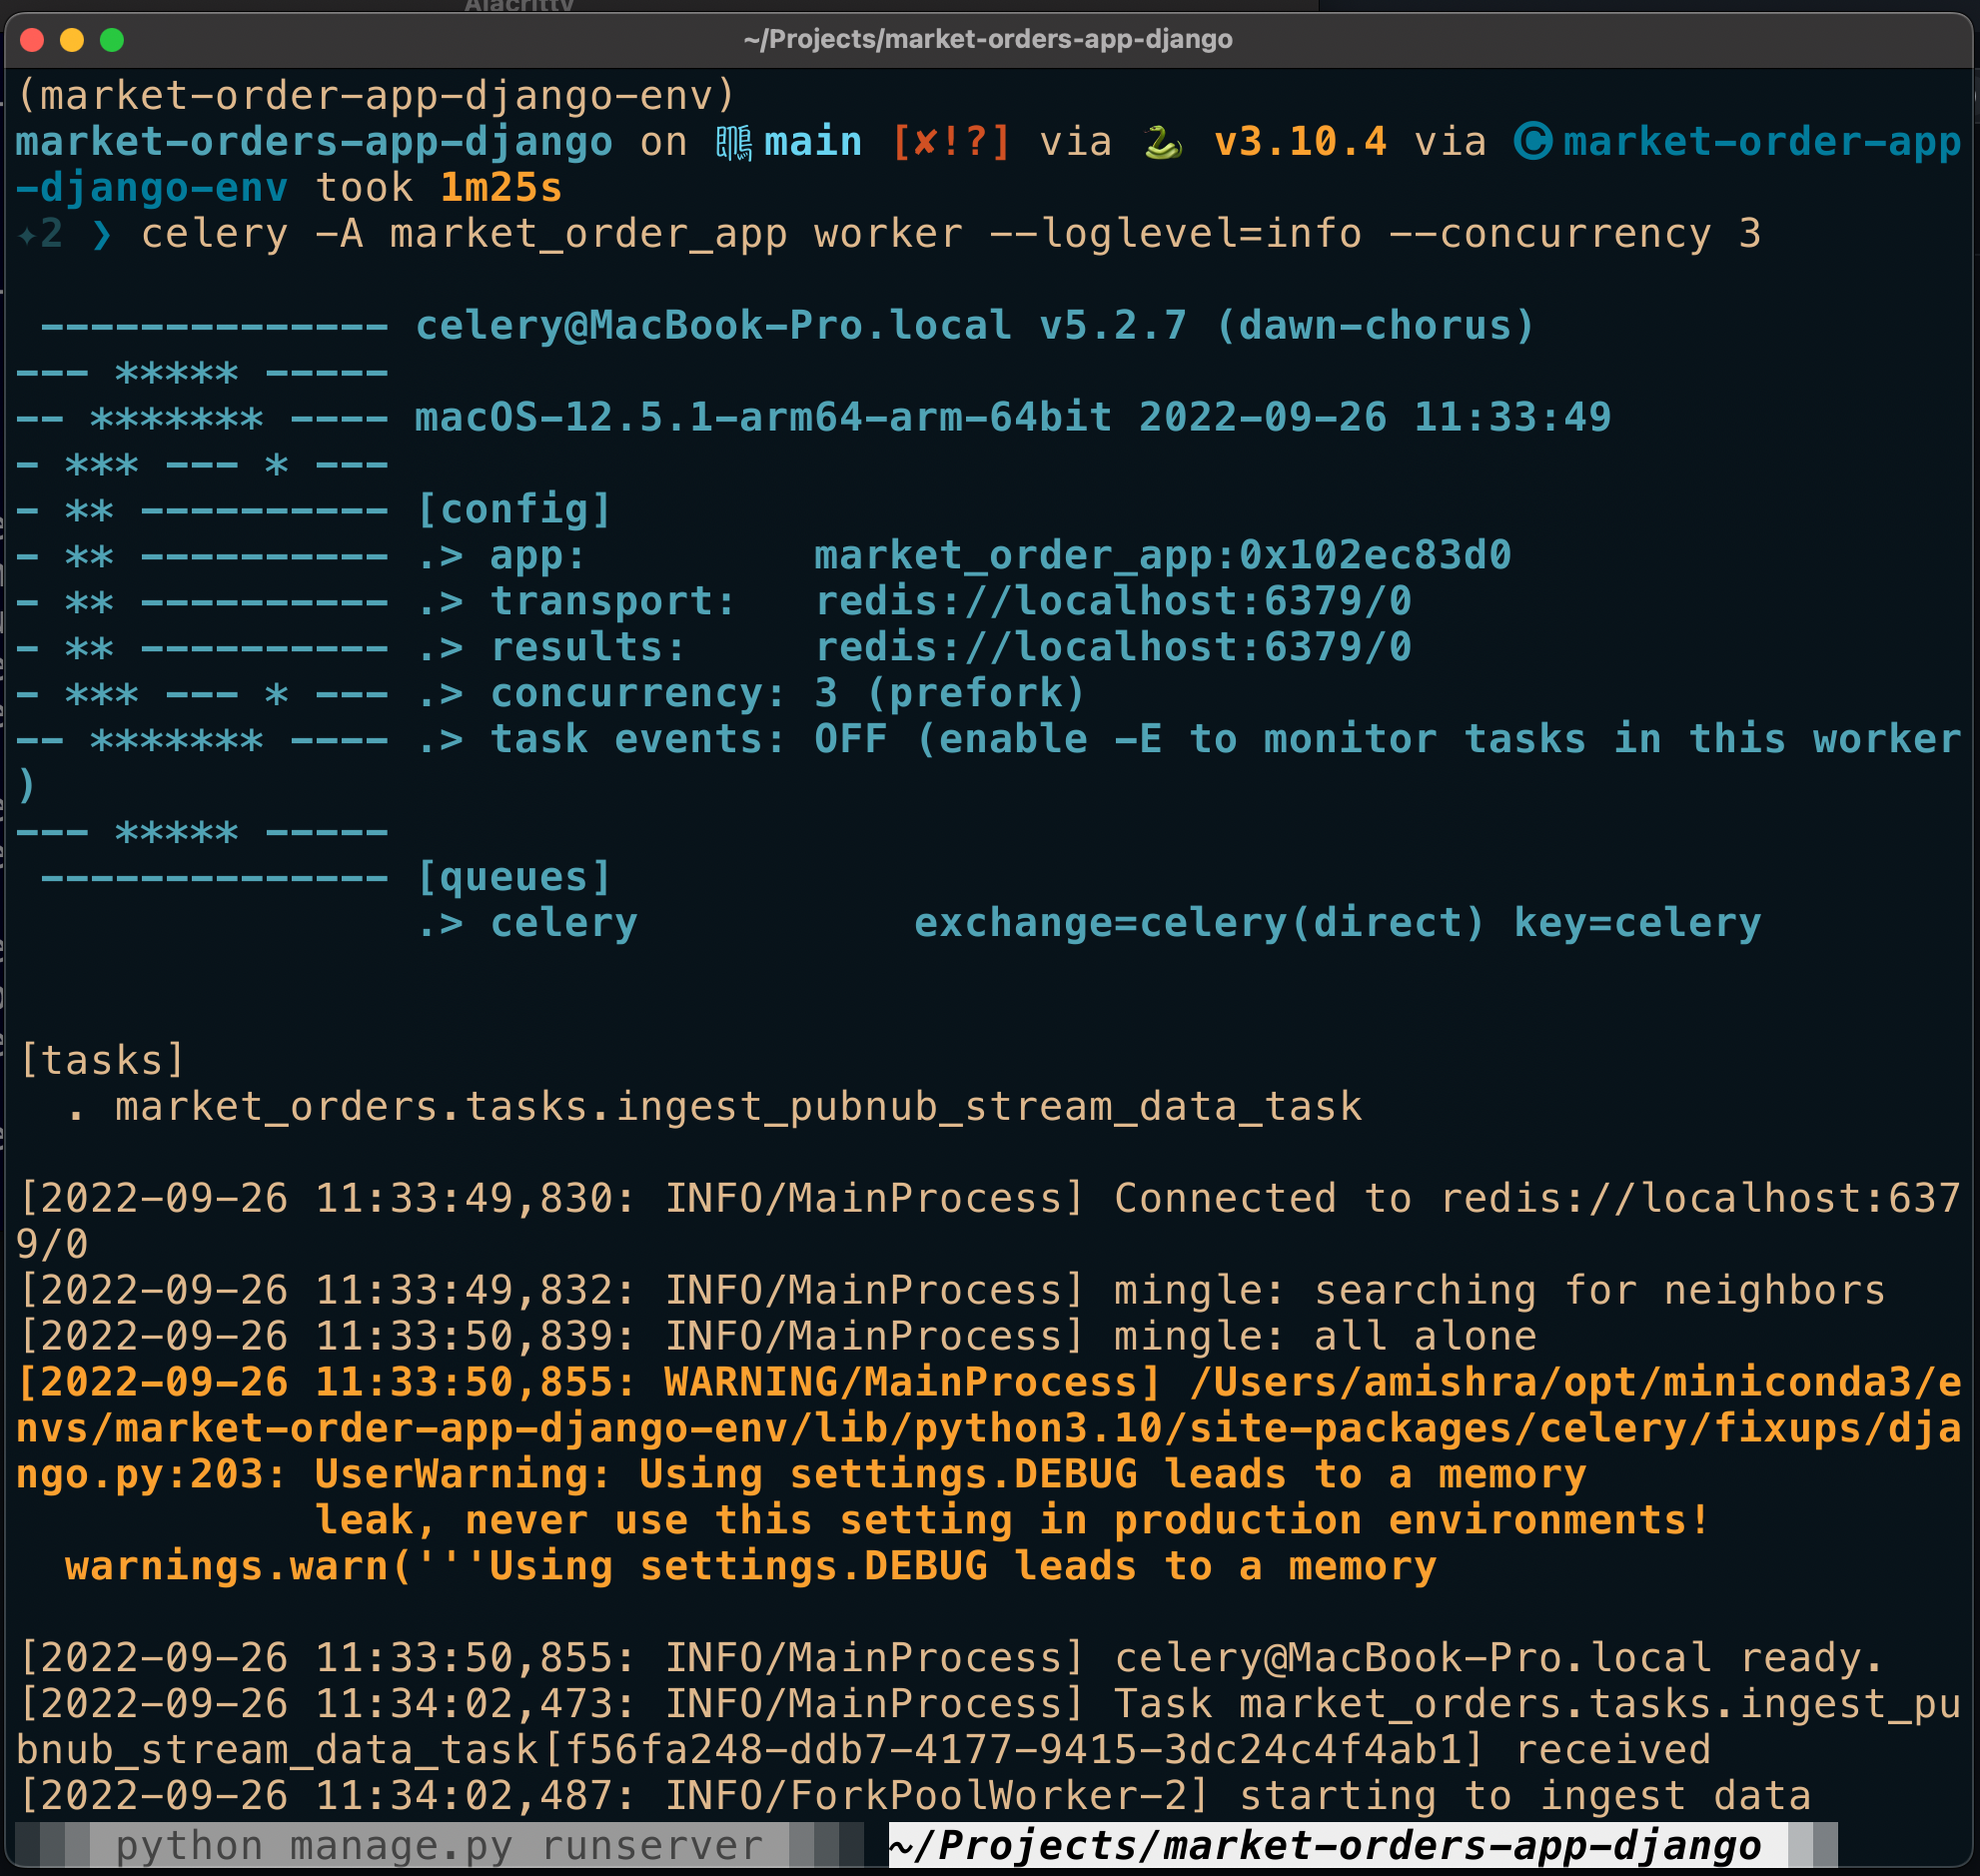

In the above celery worker window, you can see data coming from the PubNub stream.
With the Django app, we can subscribe to the data stream and write the trades to our database table. We can also get recent trades by querying the endpoints.
You can use Postman or cURL to send the requests and test the application. With any front-end client application, these endpoints can be easily integrated to query recent trades.
Here is the list of endpoints for the market order app via celery tasks.
Subscribe & ingest data:
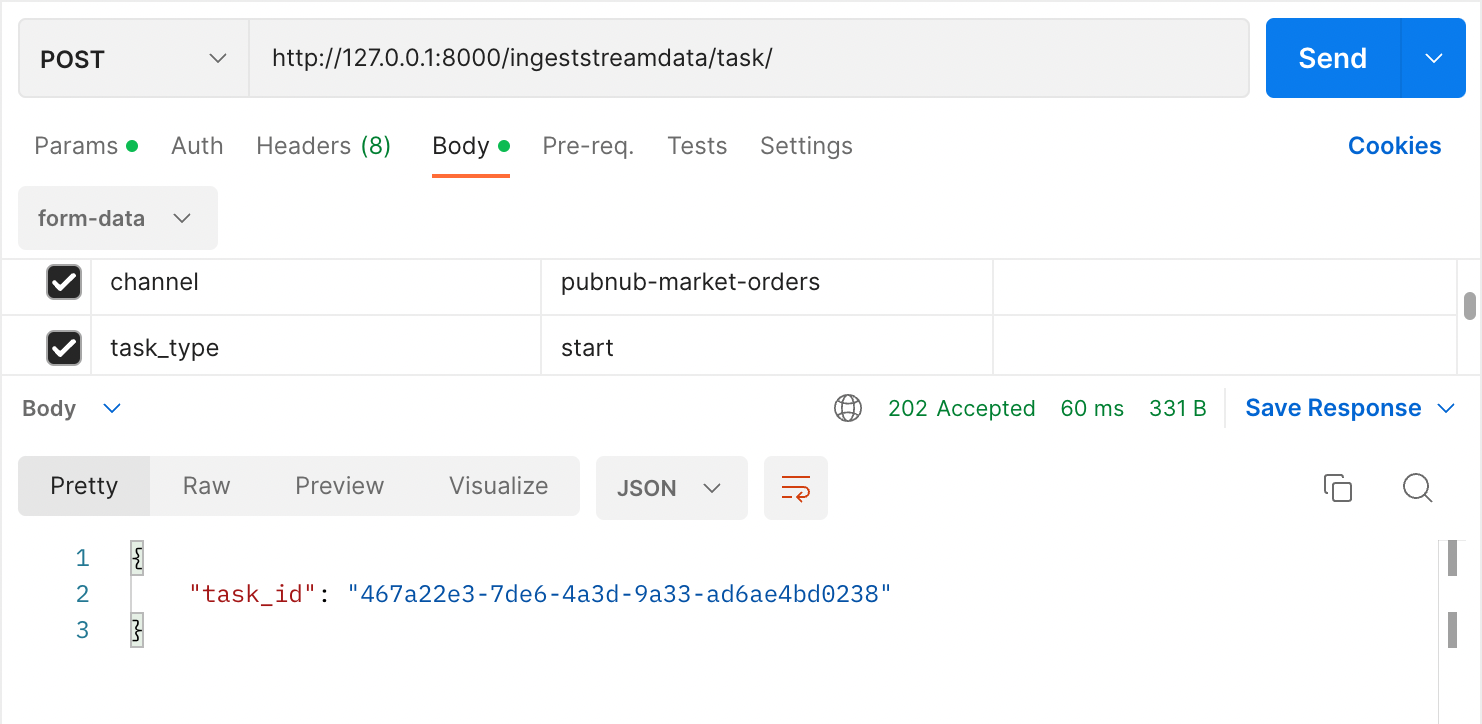
curl --location --request POST 'http://127.0.0.1:8000/ingeststreamdata/task/' \
  --form 'channel="pubnub-market-orders"' \
  --form 'task_type="start"'
Unsubscribe & stop the data ingestion task (it will stop the celery workers execution):
curl --location --request POST 'http://127.0.0.1:8000/ingeststreamdata/task/' \
  --form 'channel="pubnub-market-orders"' --form 'task_type="stop"'
Here is the screenshot of the response from the API call in Postman.
Subscribe & ingest data from the channel:
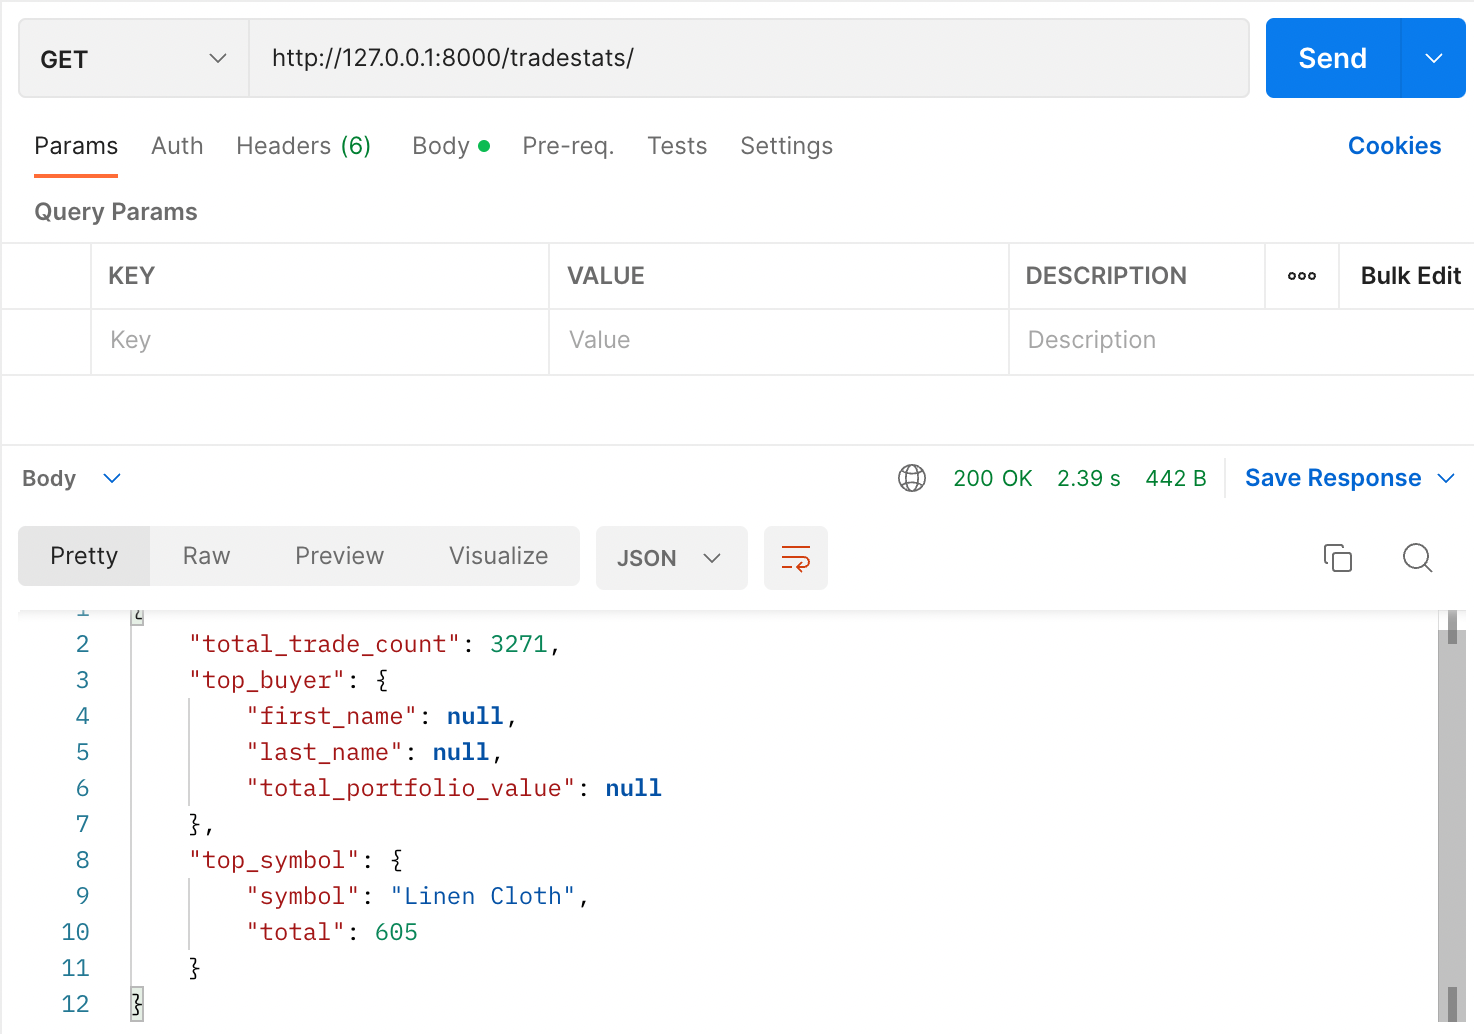
Get Trade stats:
This application also supports the transitional way to ingest the market data stream to YugabyteDD using Django views. To find out more about these endpoints, check out the project repository.
Let’s talk scaling
As your application grows in popularity, you'll need it to scale to handle more traffic and data. An application is said to be scalable if it can handle the increasing load without performance degradation.
In order to scale a Django application, a number of factors must be considered.
Django uses a “shared-nothing” architecture, which means you can add hardware at any level. This means that each server in a Django application has its own database and cache. This is important to keep in mind when scaling Django horizontally.
Django also has a built-in caching system. This caching system is designed to greatly improve the performance of Django applications. There are many ways to do this so check out https://highperformancedjango.com to discover more.
Considering the above-mentioned application, let’s say that in the future the number of tasks increases - sending user updates, consuming another stream of data from different data vendors, etc.
By adding more celery workers, you can distribute the load of your application and make it more responsive. You can do:
$ celery -A market_orders --loglevel=INFO --concurrency=10 -n worker1@%host
$ celery -A market_orders --loglevel=INFO --concurrency=10 -n worker2@%host
$ celery -A market_orders --loglevel=INFO --concurrency=10 -n worker3@%host
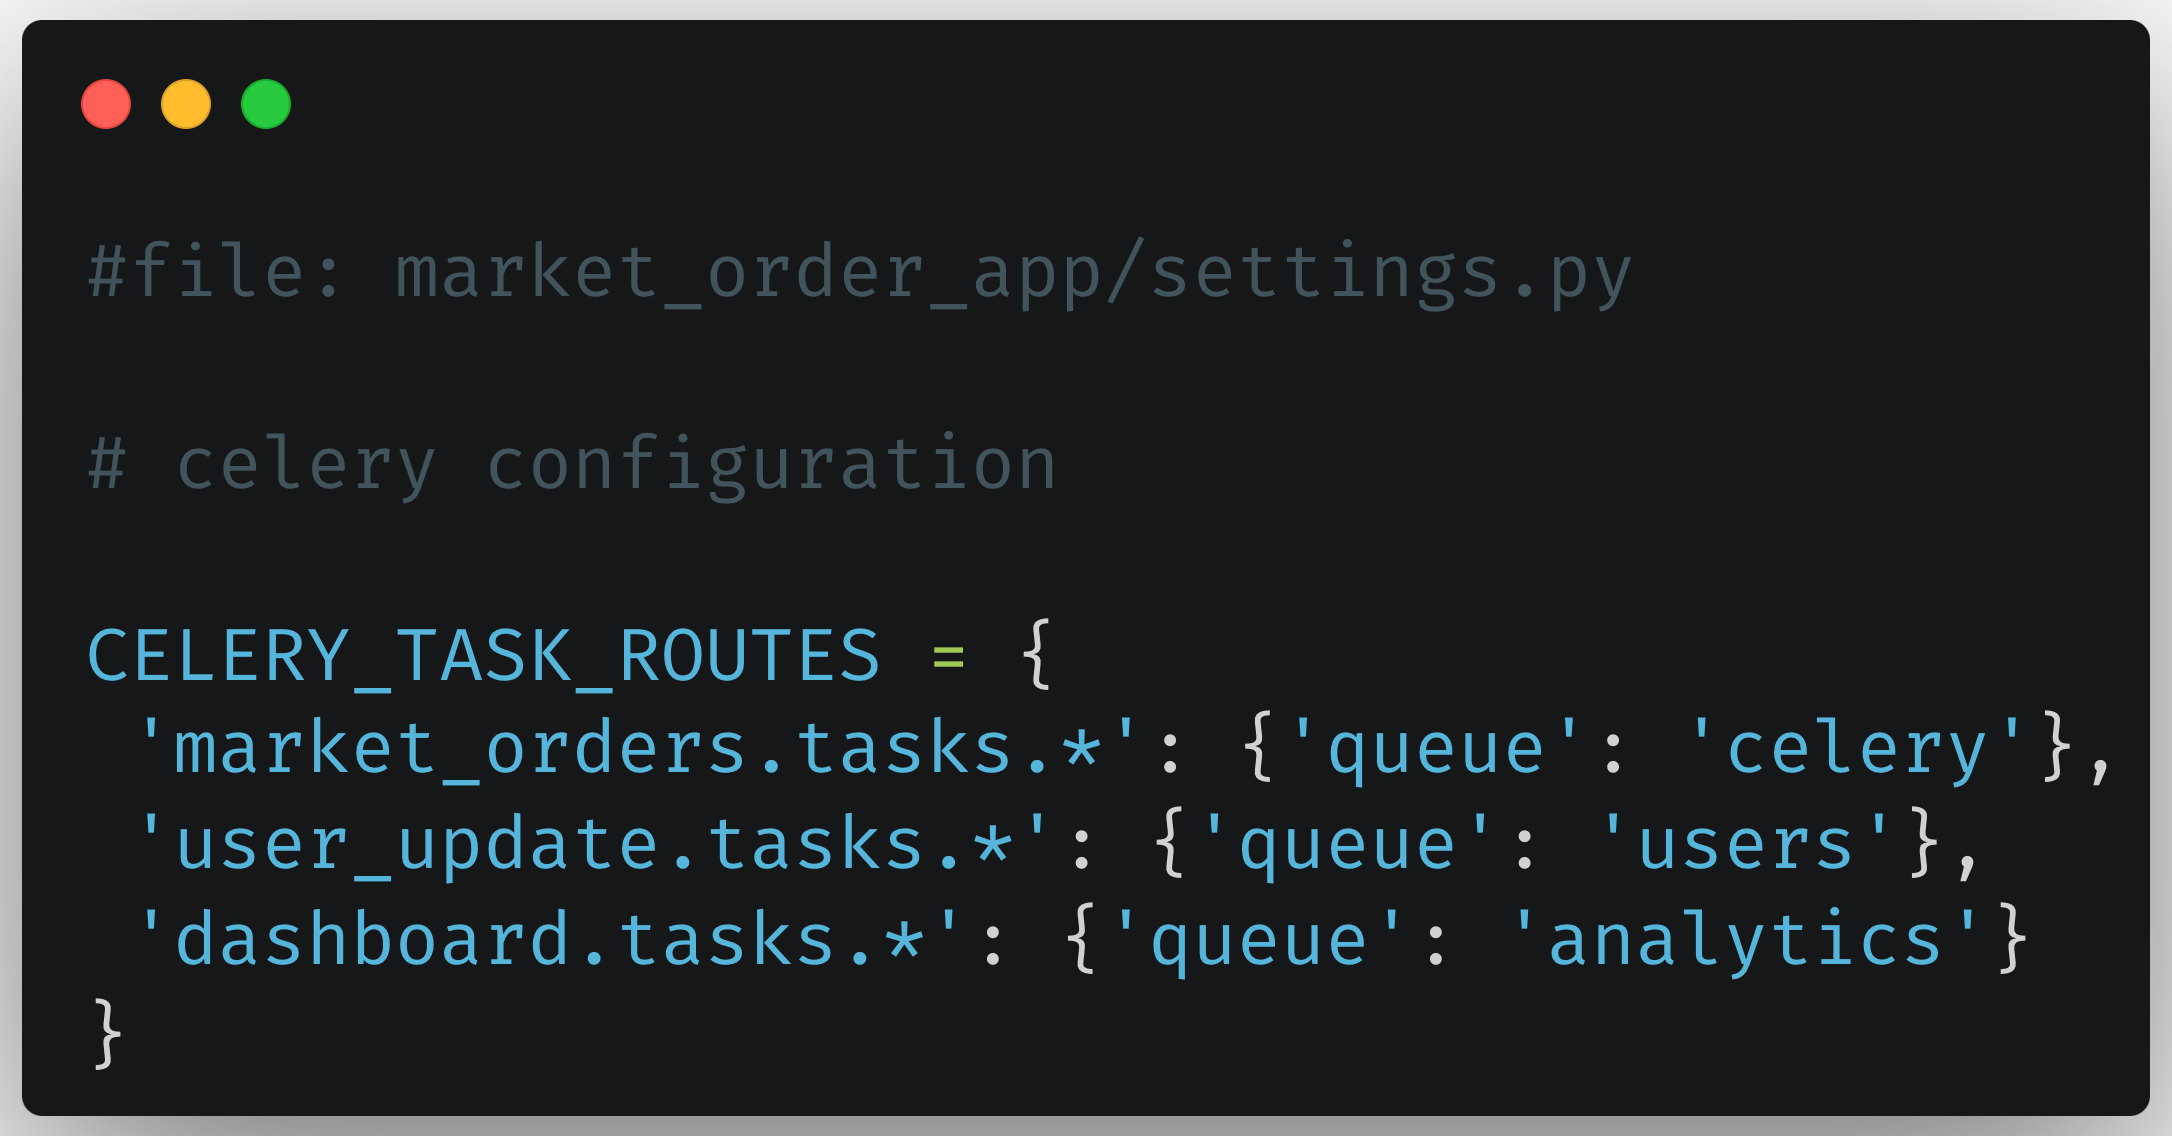
Scaling task queues involves multiple factors, we can start by prioritizing the important task to put in a different queue with higher priority.
Celery has the feature of having multiple queues. By default, a consumer only consumes from the celery (default) queue. Different consumers consume from one or more queues, so if you have multiple tasks that are not coupled you can simply create multiple queues by adding task routes config to the settings.py in your Django app.
Checkout autoscaling control for process pool celery as well.
Databases are usually ignored at the initial level when it comes to scaling the application as a whole system.
Generally scaling the relational databases is more difficult than scaling an application. The application itself must be designed for scalability. This means that it must be able to handle a large number of users without slowing down. It must also be able to handle a large amount of data.
YugabyteDB allows you to scale your database vertically & horizontally.
You can add more CPUs to the running nodes (3 in this case, leaving the number of nodes unchanged), or you can add more nodes to your cluster as your data grows.
Below is the performance metric from the 3 node cluster:


If the data load increases, you can go to your managed cluster, edit infrastructure and add additional nodes.

Once we increase the number of nodes (6 in this case, as shown below) you can see how significantly the performance increases, as the reads and writes requests are distributed across the nodes.
This will help you keep your database fast and responsive even as your traffic and data increases.


Using YugabyteDB on the database layer ensures that you can handle more load, and scale quickly and efficiently when your data workload increases. This is because adding more nodes to the cluster can help increase the performance of the system and our performance improved significantly.
Now that you've got the hang of things, you can start building your projects with YugabyteDB!

